Yetibotうざいっす。あと404でるのでrobots.txtのほうもちゃんと書いておいた。
@app.route("/robots.txt")
def display_robots_txt():
    return app.send_static_file("robots.txt")
Yetibotうざいっす。あと404でるのでrobots.txtのほうもちゃんと書いておいた。
@app.route("/robots.txt") def display_robots_txt(): return app.send_static_file("robots.txt")
25012011 Flask
MLに流れてた。
app.routeでそれ用のを書く
@app.route("/favicon.ico")
def favicon():
    return app.send_static_file("favicon.ico")
または、メタ情報として書いとく
<link rel="shortcut icon" href="{{ url_for('.static',filename='favicon.ico') }}" />
自分で使うとしたら後者かな
後者だとクローラーがやってきては404を残していくのでapp.routeで書いておくほうがいいかな
MLより
multiprocessingを使えばいいらしい。
import time
from multiprocessing import Process
from flask import Flask

app = Flask(__name__)

@app.route('/')
def index():
        return "Hi there!!!"

def run():
    app.run()

if __name__ == '__main__':

    app.debug = True

    print "starting process"
    server = Process(target=run)
    server.start()

    print "sleeping"
    time.sleep(5)

    print "ending process"
    server.terminate()
    server.join()

    print "bye..."
どういうシチュエーションでこういう必要性が出るのかいまいちわからんが覚えておこう。
さっきのやつをgaeで動かしてみる。
git clone https://github.com/gigq/flasktodo.git gmaptweetgae
cd gmaptweetgae
でapplication.pyをFlask用のコードに置き換えてapp.yamlを適当に設定したら
appcfg.py update .
で、できたサイト。多分自分はよく使うので満足。
10012011 Python javascript HTML5 Flask
HTML5 APIガイドブック コミュニケーション系API編が面白い。ひと通り読んだので、コード書いてみてる。
2章のサンプルコードをFlaskで。サンプルコードは3つのHTMLファイルが必要だけどFlask使えば一つのファイルに全部押し込めるので管理が楽。

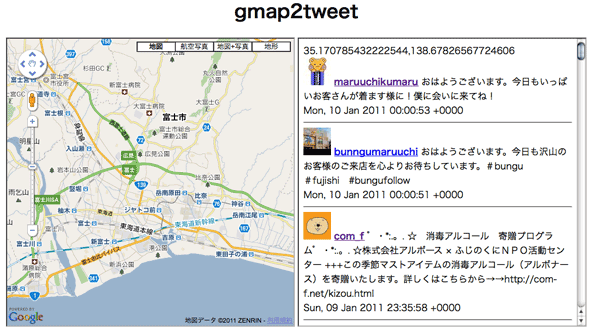
初期値は富士市役所のあたりから半径5キロ以内のtweetを探すようにした。で地図をドラッグすると、それに伴いtweetも連動して表示されるので、ほーこんなユーザーいるのか!と新たな発見もあった。
この本は入門書として最適かもしれん。
Flaskコード
#!/usr/bin/env python
# -*- encoding:utf-8 -*-

from flask import Flask

app = Flask(__name__)

@app.route("/")
def processing():
    response = """
<!doctype html>
<html lnag=ja>
<head>
<meta charset="utf-8">
<style type="text/css">
.page { margin: 0px auto; border: 0px; padding: 0px; text-align: center;}
</style>
</head>
<body>
<div class=page>
<h1>gmap2tweet</h1>
<iframe src="/googlemap" id=gmap width="500px" height="500px"></iframe>
<iframe src="/twitter" id=twitter width="500px" height="500px"></iframe>
<div id=mesg></div>
</div>
<script>
  var initialize = function(){
    var origin = location.protocol + "//" + location.host;
    var iframes = document.querySelectorAll('iframe');

    for(var i = 0; i < iframes.length; i++){
      iframes[i].contentWindow.postMessage('init', origin);
    }

    window.addEventListener('message', function(e){
        if (e.origin == origin) {
          document.getElementById('mesg').innerHTML = "receive data via xdm::" + e.data;
          document.getElementById('twitter').contentWindow.postMessage(e.data, origin);
        }
    }, false);
  }
  window.onload = function(){ initialize(); }
</script>
</body>
</html>
"""
    return response

@app.route("/twitter")
def twitter_processing():
    response = """
<!doctype html>
<html lang=ja>
<head>
<meta charset="utf-8">
</head>
<body>
<div id=mesg></div>
<div id=results></div>
<script>
var origin = location.protocol+"//"+location.host;
var parentWin = null;
var api="http://search.twitter.com/search.json?callback=show&rpp=50&geocode=";
var jsonpObj =null;

var sendJsonp = function(latlng, radius){
  if(jsonpObj)
    document.body.removeChild(jsonpObj);
  var scr = document.createElement('script');
  scr.src = api+encodeURIComponent(latlng+","+radius+"km");
  scr.type = "text/javascript";
  jsonpObj = document.body.appendChild(scr);
};

var show = function(obj){
  var results = obj.results;
  var out = '';
  var template = '<img src="#{img}"> <a href="http://twitter.com/\
#{from_user}" target="_blank"><b>#{from_user}</b></a> #{text}<br />\
#{created_at}<hr />';

  for(var i = 0; i < results.length; i++){
    var res = results[i];
    var tmp = template.replace("#{img}", res.profile_image_url) \
.replace("#{from_user}", res.from_user) \
.replace("#{from_user}", res.from_user);
    tmp = tmp.replace("#{text}", res.text) \
.replace("#{created_at}", res.created_at);
    out += tmp;
  }

  document.getElementById('results').innerHTML = out;
};

window.addEventListener('message', function(e){
  if(e.origin == origin) {
    if (e.data == 'init') {
      parentWin = e.source;
    } else {
      document.getElementById('mesg').innerHTML = e.data;
      document.getElementById('results').innerHTML = "読み込み中";
      sendJsonp(e.data, 5);
    }
  }
}, false);
</script>
</body>
</html>
"""
    return response

@app.route("/googlemap")
def google_processing():
    response = """
<!doctype html>
<html lang=ja>
<head>
<meta charset="utf-8">
<meta name="viewport" content="initial-scale=1.0, user-scalable=no">
<script type="text/javascript" src="http://maps.google.com/maps/api/js?sensor=false"></script>
</head>
<body style="padding:0;margin:0;height:500px">
<div id=map_canvas style="width: 100%; height: 100%; border: 0px"></div>

<script>
var parentWin = null;
var origin = location.protocol + "//" + location.host;

var start = function() {
  var latlng = new google.maps.LatLng(35.164190, 138.678609);
  var myOptions = {zoom: 13, center: latlng, mapTypeId: google.maps.MapTypeId.ROADMAP};

  var map = new google.maps.Map(document.getElementById("map_canvas"), myOptions);

  var getCenter = function(){
    var center = map.getCenter();
    var lat = center.lat();
    var lng = center.lng();
    if(parentWin) {
      parentWin.postMessage(lat+","+lng, origin);
    }
  };

  window.addEventListener('message', function(e){
    if(e.origin == origin) {
      if(e.data == 'init') {
        parentWin = e.source;
        getCenter();
      }
    } else {
      alert("illegal message from " + e.origin);
    }
  }, false);

  google.maps.event.addListener(map, 'dragend', function(e){getCenter();});
  google.maps.event.addListener(map, 'zoom_changed', function(e){getCenter();});

};

window.onload = function(){start();};
</script>
</body>
</html>
"""
    return response

if __name__ == "__main__":
    app.run()
FlaskでRSSを出力するのにテンプレートを使っていたのだけど、zenbackの関連記事が一向に反映されなくて、Feed Validation Serviceにかけたらvalidじゃないとか言われたのでおそらくこれだろうと。
で、Feed::XMLみたいなのないかなぁと探したらfeedgeneratorってのがあったのでこれを使ってみたら便利。★10と行きたいところであったが、RSSのタイムゾーンではまったので★9くらいで。
結局、dateutil を使ったタイムゾーン管理 / Twisted Mindを参考にしてreplaceで変更した。
tz    = gettz('Asia/Tokyo')
title = u"Drkcore"
link  = u"http://blog.kzfmix.com/rss"

feed = feedgenerator.Rss201rev2Feed(
    title       = title,
    link        = link,
    feed_url    = u"http://blog.kzfmix.com/rss",
    description = u"Programming, Music, Snowboarding",
    language    = u"ja"
    )

for entry in entries:
    categories = [tag.name for tag in entry.tags]
    feed.add_item(
        title       = entry.title,
        link        = u"http://blog.kzfmix.com/entry/" + entry.perma,
        description = entry.htmlized_content,
        pubdate     = entry.pubdate.replace(tzinfo=tz),
        categories  = categories
        )

response = make_response(feed.writeString('utf-8'))
response.headers['Content-Type'] = 'application/xml; charset=utf-8'
return response
FlaskでJinja2のカスタムをフィルターを使いたい。具体的にはテンプレート中で{{ URL | urlencode }}がやりたい。
urlエンコードはwerkzeug.urlsのurl_quote_plusをつかえばいい。
>>> from werkzeug.urls import url_quote_plus
>>> url_quote_plus('http://www.kzfmix.com')
'http%3A%2F%2Fwww.kzfmix.com'
Jinja2だとEnvironmentオブジェクトに新しいフィルターを突っ込めばいい
>>> from jinja2 import Environment, PackageLorder
>>> env = Environment(loader=PackageLoader('testapp', 'templates'))
>>> env.filters['urlencode'] = url_quote_plus
>>> template = env.get_template('template.txt')
>>> template.render(url='http://www.kzfmix.com')
u'URL: http%3A%2F%2Fwww.kzfmix.com'
Flaskの場合にはjinja_envってのが用意されているので、ここからfiltersに突っ込めばいいだけだった。
from flask import Flask,render_template
from werkzeug.urls import url_quote_plus

app = Flask(__name__)

app.jinja_env.filters['urlencode'] = url_quote_plus
Registering Filtersに書いてあった。
(前回までのあらすじ)
今まではCatalystで書いたブログシステムを使っていたのだけど、新しいバージョンのCatalystで動かすためには、色々書きなおさないとこが多すぎて、めんどうだなぁ、どうしようかなぁと思っていたところFlaskの存在を知って、おー楽しそう、書きなおそうとカキカキしていた(夏ごろ)。
(あらすじおわり)
で、ある程度まで作ったものの、なんだかモチベーションが下がって放置していたflaskベースのblogシステムだけど、Mashup Award6で小飼弾さんの 404 API Not Found賞を授賞しましたで、僕のエントリがお役に立ててよかったですねとか。
てか、よく考えたら自分はなんにも作り上げて無いじゃん?と、やる気が戻ってきた(blogはこういうレスポンスがもらえたりするのでいいですね)ので、今週は頑張って動かすとこまで持っていった。(あとは今週は風邪とか謎の頭痛、腹痛で体調は最悪だったが、逆に時間がまとめてとれたので布団の中でゴニョゴニョできた)
データベースはCatalystで使っていたSqliteのファイルをそのまま流用したので、データの変換とかしないで移行できた。あと、SQLAlchemyのDeclarative便利すぎ。
Flaskのドキュメント読みながらmod_wsgi対応させたけど、apache再起動しなくても変更が反映されるようになるのが良い。
手元のmacbookで開発 -> サーバーのバックアップリポジトリにpush -> バックアップリポジトリから稼動させてるディレクトリにpull
という流れで変更を反映できる。
特に意味はないがMochikitからjQueryへ変えてみた。jQueryプラグインは便利なんだかどうなんだかわからない。自分でやりたいようにするには手を入れなければいけないことが多いような気がするので。
結局自分でプラグイン書けるようになる必要があるというか、getJSONをうまく使いこなすのがFlaskで楽しく開発するコツかもと思った。それにしてもFlaskのjsonifyは便利ですな。
python-amazon-product-api使ってみたけど、Net::Amazonのほうが使いやすかった。
24082010 Flask Processing.js
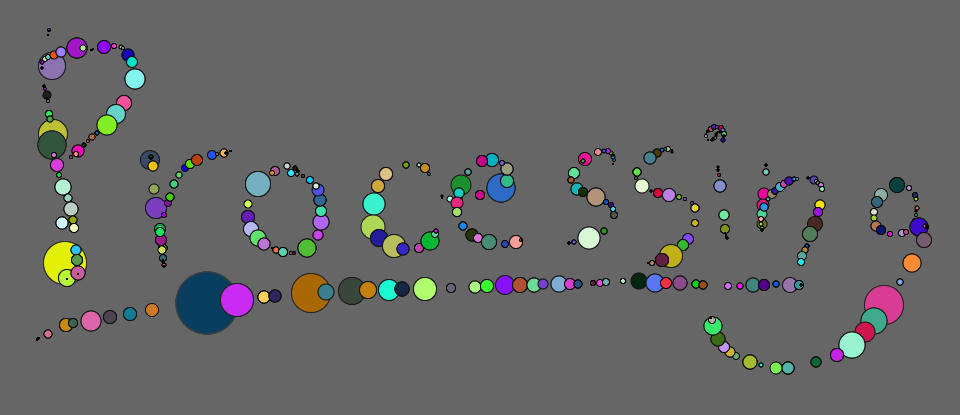
staticディレクトリにprocessing.jsを置いて
from flask import Flask

app = Flask(__name__)

@app.route("/")
def processing():
    response = """
<html>
<head>
<title>Processing Sample</title>
<style  type="text/css">
body {margin:0; padding:0;}
</style>
<script type="text/javascript" src="static/processing-0.9.7.js"></script>
<script type="text/javascript">
window.onload = function() {
  var canvas = document.getElementsByTagName('canvas')[0];
  var codeElm = document.getElementById('processing-code');
  var code = codeElm.textContent || codeElm.innerText;
  Processing(canvas, code);
};
</script>
<script id="processing-code" type="application/processing">
void setup()
{
  size(window.innerWidth, window.innerHeight);
  background(102);
  smooth();
}

void draw() {
if (mousePressed == true) {
    variableEllipse(mouseX, mouseY, pmouseX, pmouseY);
    }
}

void variableEllipse(int x, int y, int px, int py)
{
  float speed = abs(x-px) + abs(y-py);
  stroke(speed);
  fill(random(0,255),random(0,255),random(0,255))
  ellipse(x, y, speed, speed);

}
</script>
</head>
<body>
<div>
<canvas width="400" height="400"></canvas>
</div>
</body>
"""
    return response

if __name__ == "__main__":
    app.run()

参考
 Built with Processing[Ver. 1.x対応版] -デザイン/アートのためのプログラミング入門
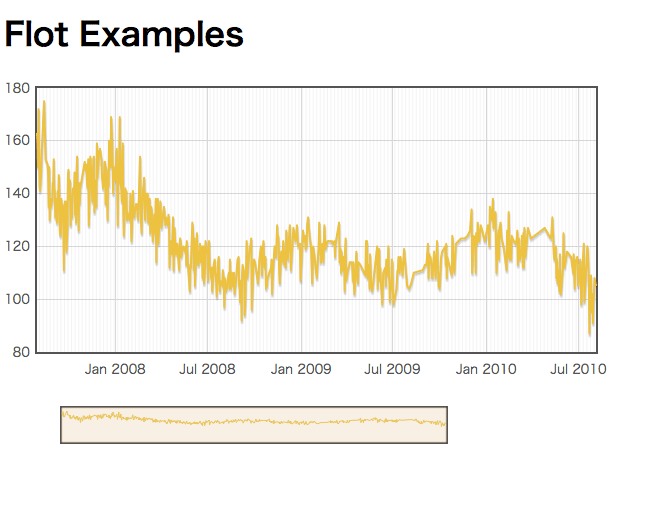
flotというjQuery製のグラフ描画ライブラリがあるのだけど、Flaskにはjsonifyがあるので連携割と楽だろうと書いてみたら超楽だった。
from flask import Flask, request, redirect, url_for, jsonify, render_template
from database import db_session
from models import Bp
from datetime import datetime
from calendar import timegm

Debug      = True
SECRET_KEY = 'development key'

app = Flask(__name__)
app.config.from_object(__name__)

@app.after_request
def after_request(response):
    db_session.remove()
    return response

@app.route('/')
def show_graphs():
    return render_template('flot.html')


@app.route('/json')
def json_bps():
    bps = db_session.query(Bp).all()
    bpp = [[timegm(bp.date.timetuple())*1000, bp.sbp] for bp in bps]
    return jsonify(bp=bpp)

if __name__ == '__main__':
    app.run()
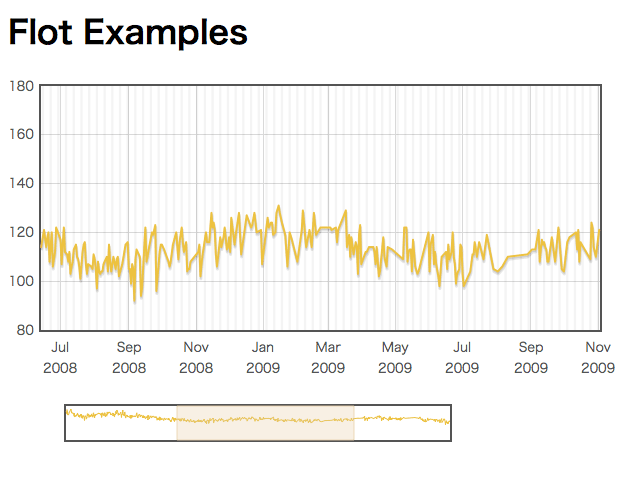
結局どういうJSONをどのURIにマップするかを考えるのかが重要なのかな。htmlはvisitors per day with zooming and weekendsをちょっとモディファイした。

したのほうの小さいグラフで選択するとその領域がすぐに反映される。インタラクティブなグラフがすぐ作れる
